To salvage the partially cut pieces, I drew a horizontal line one inch long in QCAD, ran through SheetCAM (because it wasn't a closed surface, SheetCAM wouldn't add leadin, which was fine), opened in TM VMD, manually jogged the torch until it lined up next to where the cut needed to happen, Z'd the torch, set the plate origin, and hit cut. With careful alignment, you can't tell that the joint was re-cut. I salvaged five parts, and the total was what I needed.
It's fun figuring out creative ways to work around some issues...thought it's going to be sweet when I get the flameout issue resolved.
Getting a Torchmate 4400 running
-
jlasater
- 2 Star Member

- Posts: 89
- Joined: Thu Aug 08, 2024 5:41 pm
- Location: NE Oregon
- Contact:
-
adbuch
- 6 Star Elite Contributing Member

- Posts: 9854
- Joined: Thu Sep 21, 2017 5:22 pm
- Location: Tucson, Arizona
- Contact:
Re: Getting a Torchmate 4400 running
That's a great way to get more parts per sheet.
David
David
-
jlasater
- 2 Star Member
- Posts: 89
- Joined: Thu Aug 08, 2024 5:41 pm
- Location: NE Oregon
- Contact:
Re: Getting a Torchmate 4400 running
It seemed a bit...ghetto, but it was MUCH easier than dragging the 4x4ft plate across the shop to where the other plasma torch is. I need to put a much longer cord on that one and keep it near the plasma table to cut up what someone else called "skeletons", left over plate remnants.
So looking at one of Jim Colt's posts in the tips section, I'm pretty sure SheetCAM defaulted to cutting CCW on the plates I cut. Would cutting it the "right" direction, CW, have made a substantial difference to the bevel I saw or just a slight difference?
So looking at one of Jim Colt's posts in the tips section, I'm pretty sure SheetCAM defaulted to cutting CCW on the plates I cut. Would cutting it the "right" direction, CW, have made a substantial difference to the bevel I saw or just a slight difference?
-
ben de lappe

- 4 Star Elite Contributing Member

- Posts: 1287
- Joined: Mon Aug 03, 2009 9:37 am
- Location: North Mississippi
Re: Getting a Torchmate 4400 running
Concerning ghetto, results are all that matter. I had a powermax 380 with 25' leads that I'd use on the rare occasion the cut failed to complete. Much better than attempting to drag a skeletonized 5x10 sheet anywhere. 
Interior cuts CCW, outer perimeter CW mainly pertains to warpage on pieces with interior cuts so I don't really see that having a profound effect on bevel.
Interior cuts CCW, outer perimeter CW mainly pertains to warpage on pieces with interior cuts so I don't really see that having a profound effect on bevel.
-
adbuch
- 6 Star Elite Contributing Member
- Posts: 9854
- Joined: Thu Sep 21, 2017 5:22 pm
- Location: Tucson, Arizona
- Contact:
Re: Getting a Torchmate 4400 running
"When using standard consumables, the plasma arc spins clockwise as the torch moves forward into the cut. The squarest cut angles will be on the right side of the arc. As a result, contour shapes are cut in a clockwise direction. When cutting internal features, the torch needs to travel in a counter-clockwise direction."jimcolt wrote: ↑Wed Aug 05, 2015 7:11 am Plasma cutting is directional based on the swirling of the gas in the torch....one of the functions of the swirl is to minimize edge angularity on one edge of the part, which comes with the disadvantage of worse angularity on the opposite side of the cut. Common plasma cutters have a clockwise swirl....which puts the "good" cut on the right side of the torch (if the torch is cutting and moving straight away from you).
The best way to remember the bad side/good side is by thinking of a cutting a ring with an inside diameter and outside diameter. The inside is always cut Counter clockwise (ccw) and the outside is always cut Clockwise. This keeps the cut kerf on the right of the torch. Most CAM software used for plasma cutting will automatically do this...unless you override this automatic setting. If you are using CAM software that was primarily designed for milling or routing....often you need to pay attention and ensure that the direction is correct.
There are some high end industrial plasma torches that have available consumables with either standard CW swirl or with CCW swirl. There often are situations in high end manufacturing where two or more torches have to cut simultaneously and opposing swirls produce the desired effect.
Jim Colt Hypertherm
-
jlasater
- 2 Star Member
- Posts: 89
- Joined: Thu Aug 08, 2024 5:41 pm
- Location: NE Oregon
- Contact:
Re: Getting a Torchmate 4400 running
What? Didn't notice interference with another bracket during the design stage? Easy peasy.
Still blown away at how much fun this CNC stuff is. It took me about 10 minutes to create a 4.5"x.5" rectangle in QCAD, run it through SheetCAM, grab it on the Torchmate, and cut another part of a plate that had already been cut. Most of the time was lining up the torch to the start position which was a centerpunch mark I had created. Sanded paint off in the middle so IHC would work, and a corner for the ground clamp as the whole part had two coats of paint on it. And...plasma cuts fast enough, it didn't damage the paint outside of the sanded area...an oxy torch would have made a big mess.
This thing is such an enabler of projects.
-
adbuch
- 6 Star Elite Contributing Member
- Posts: 9854
- Joined: Thu Sep 21, 2017 5:22 pm
- Location: Tucson, Arizona
- Contact:
Re: Getting a Torchmate 4400 running
Your quickly becoming quite an expert!! Keep up the good work.
David

David
-
ben de lappe
- 4 Star Elite Contributing Member
- Posts: 1287
- Joined: Mon Aug 03, 2009 9:37 am
- Location: North Mississippi
Re: Getting a Torchmate 4400 running
Thank you for the correction David
-
adbuch
- 6 Star Elite Contributing Member
- Posts: 9854
- Joined: Thu Sep 21, 2017 5:22 pm
- Location: Tucson, Arizona
- Contact:
-
jlasater
- 2 Star Member
- Posts: 89
- Joined: Thu Aug 08, 2024 5:41 pm
- Location: NE Oregon
- Contact:
Re: Getting a Torchmate 4400 running
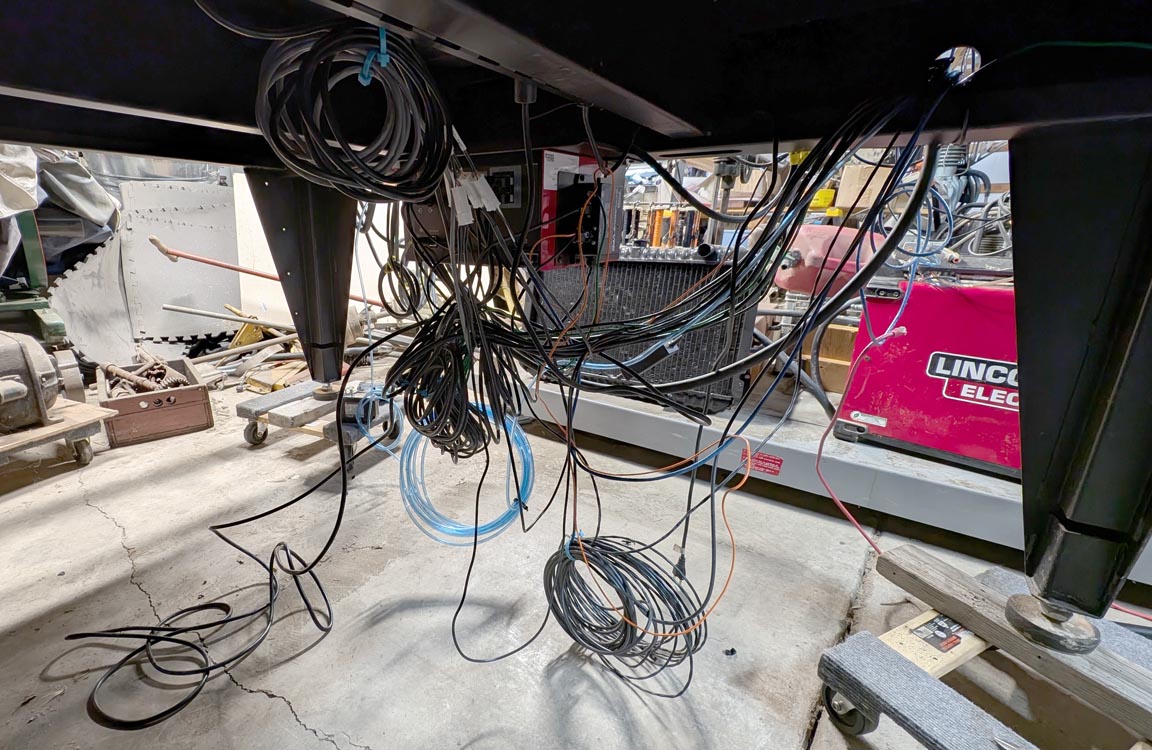
I know, I know...not everyone is as OCD about cabling as I am...but really? Who makes a rats nest like this? (this was how it was when I picked the table up from the auction)
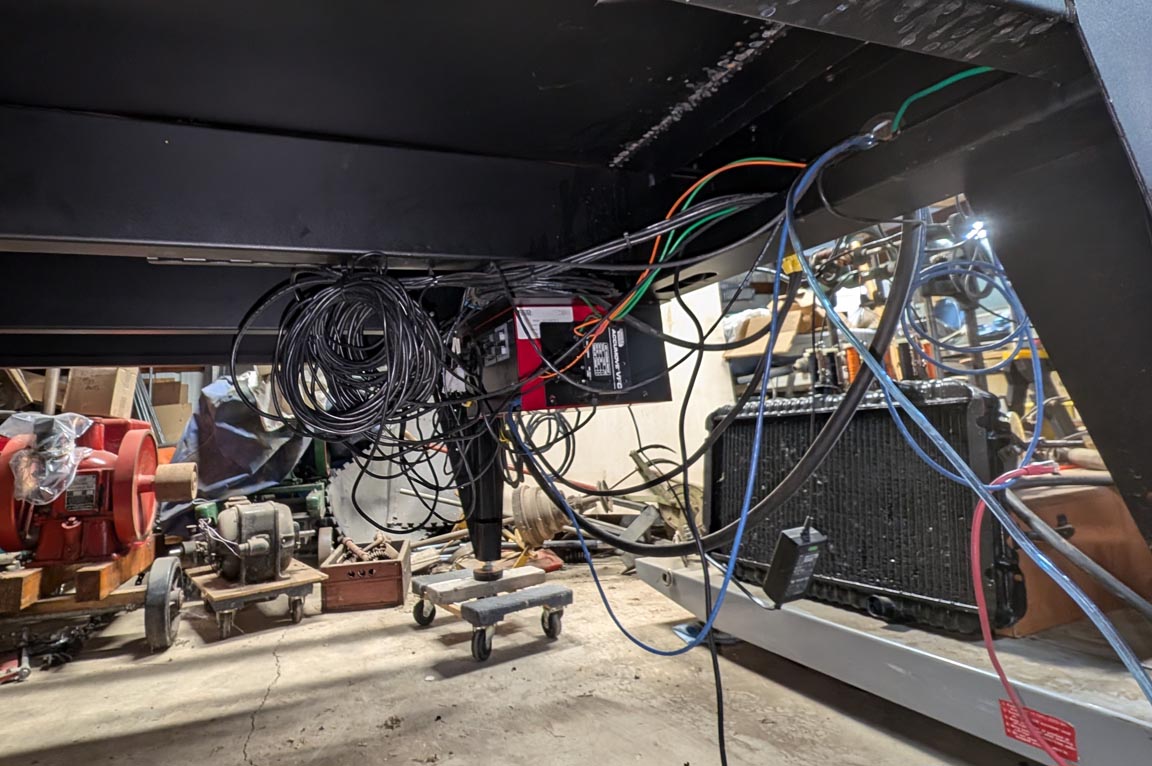
While still messy, each set of system cables is rolled up together and gently tied up for now. I'm going to add a nice wire cable tray underneath the table like we use for network cabling at customer sites soon. I shortened up the ground wires and the THC sense wire (orange).
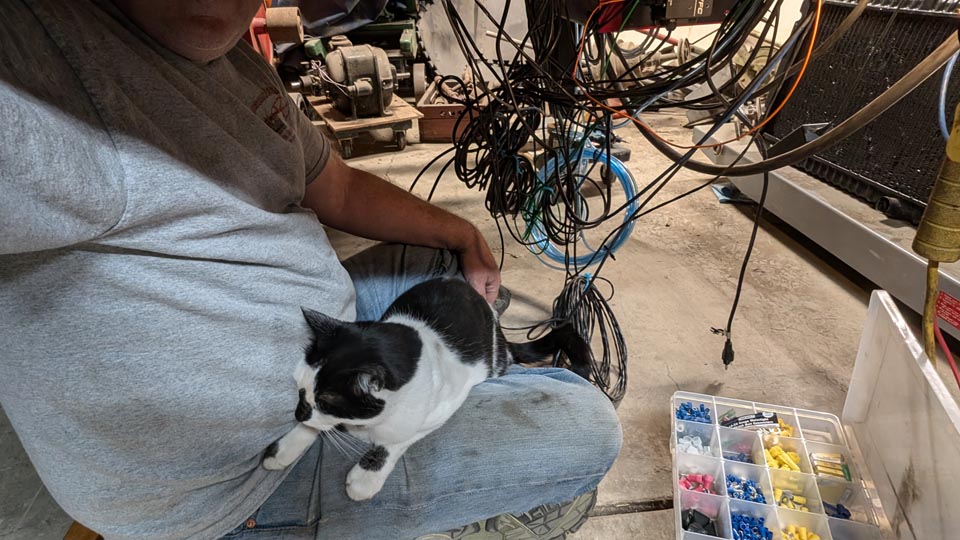
...and...Penny felt like she needed to supervise. Shooing her away only worked for a minute, she'd always come back.
I took advantage of the large expansion joint in the floor under where the table is going to sit to install a ground rod. Once final placement is decided, it'll be on the solid floor instead of on harbor freight furniture dollies (love those things, last count is 14 in the shop).
While still messy, each set of system cables is rolled up together and gently tied up for now. I'm going to add a nice wire cable tray underneath the table like we use for network cabling at customer sites soon. I shortened up the ground wires and the THC sense wire (orange).
...and...Penny felt like she needed to supervise. Shooing her away only worked for a minute, she'd always come back.
I took advantage of the large expansion joint in the floor under where the table is going to sit to install a ground rod. Once final placement is decided, it'll be on the solid floor instead of on harbor freight furniture dollies (love those things, last count is 14 in the shop).
-
jlasater
- 2 Star Member
- Posts: 89
- Joined: Thu Aug 08, 2024 5:41 pm
- Location: NE Oregon
- Contact:
Re: Getting a Torchmate 4400 running
A tip for any of you having trouble greasing the bearing cassettes on the gantry...I bought a rubber-tipped attachment for a grease gun and found unscrewing the grease zerk and using the attachment to grease the bearings worked excellent. I have *never* had so much trouble with grease zerks as on this machine. I don't know if they are metric (the end, not the threads) or what, but any coupler I use (normal style or one of the newer locking style) refuses to seal and grease just oozes out around the coupler. Using the rubber-tipped attachment allowed me to grease until it came out around the bearings.
There is nothing in the user manual for the TM4400/4800 about maintenance on the Z-axis screw. Do you guys know if it is supposed to be left dry (as mine appears to be), or greased, or use a spray dry lube on it? Granted, it doesn't do much normally when cutting, not like the gantry motors, but still...it does move.
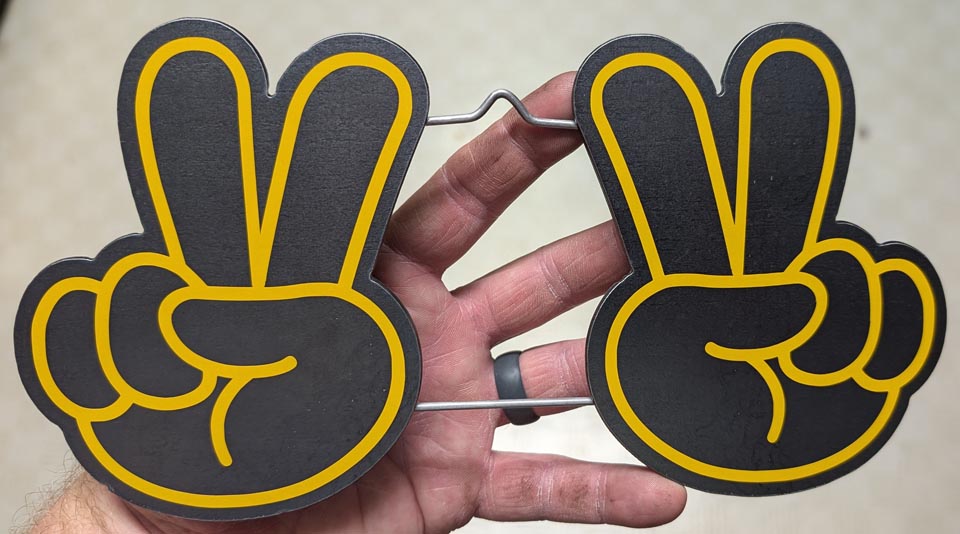
I made these just for fun for one of the helpdesk staff at work that is always throwing peace signs at people as he walks around. Once I get new consumables (including smaller than 80A tips), I'll experiment with cutting out the inside as well. The colored vinyl does a nice job of setting it off It hink.
There is nothing in the user manual for the TM4400/4800 about maintenance on the Z-axis screw. Do you guys know if it is supposed to be left dry (as mine appears to be), or greased, or use a spray dry lube on it? Granted, it doesn't do much normally when cutting, not like the gantry motors, but still...it does move.
I made these just for fun for one of the helpdesk staff at work that is always throwing peace signs at people as he walks around. Once I get new consumables (including smaller than 80A tips), I'll experiment with cutting out the inside as well. The colored vinyl does a nice job of setting it off It hink.
-
plasmanewbie
- 5 Star Elite Contributing Member

- Posts: 2713
- Joined: Thu Jul 24, 2008 11:15 am
Re: Getting a Torchmate 4400 running
I have one of those rubber tips grease guns adapters, they work awesome for odd spots and situations. Glad to see your making progress, getting things tuned up, cleaned up and already making good looking stuff
-
jlasater
- 2 Star Member
- Posts: 89
- Joined: Thu Aug 08, 2024 5:41 pm
- Location: NE Oregon
- Contact:
Re: Getting a Torchmate 4400 running
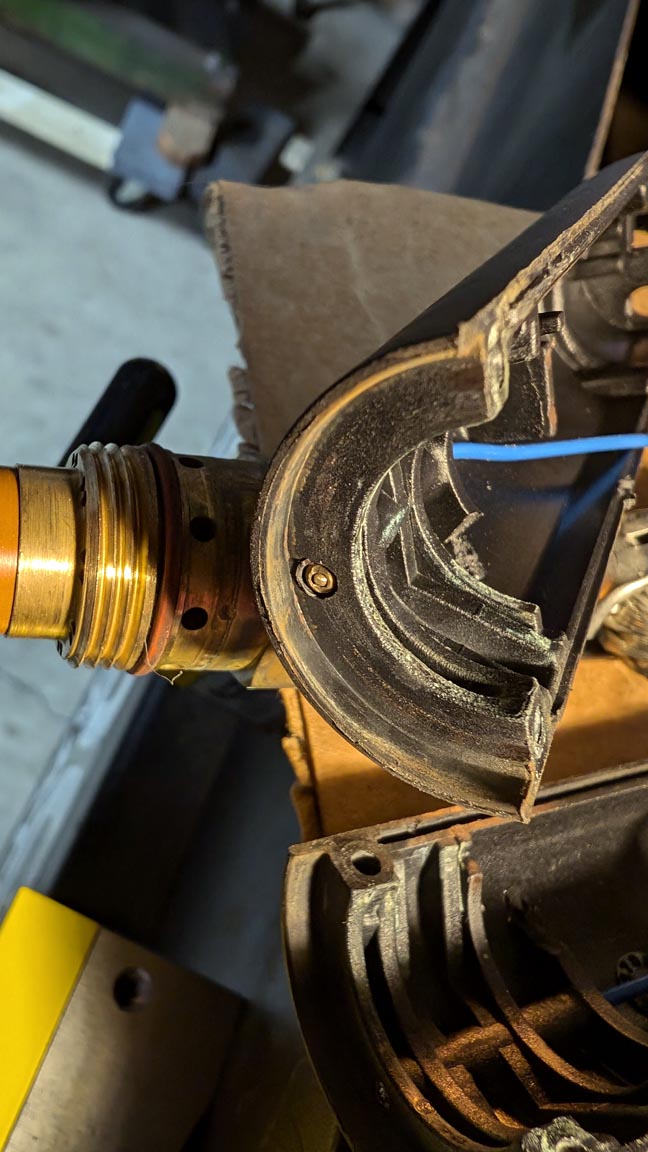
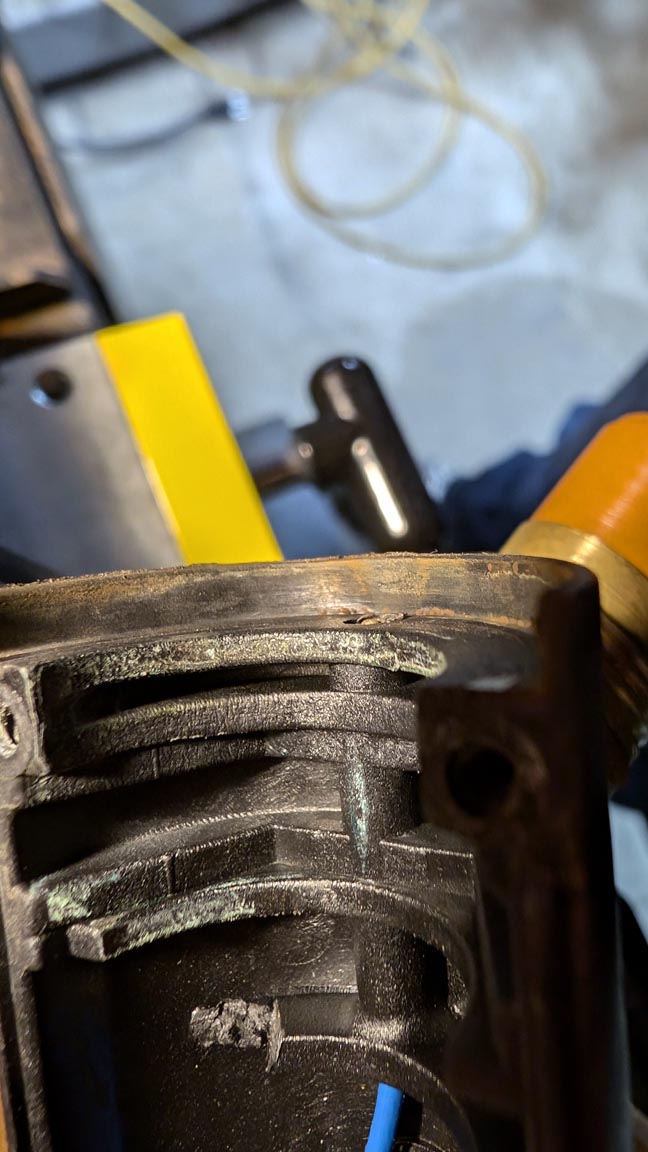
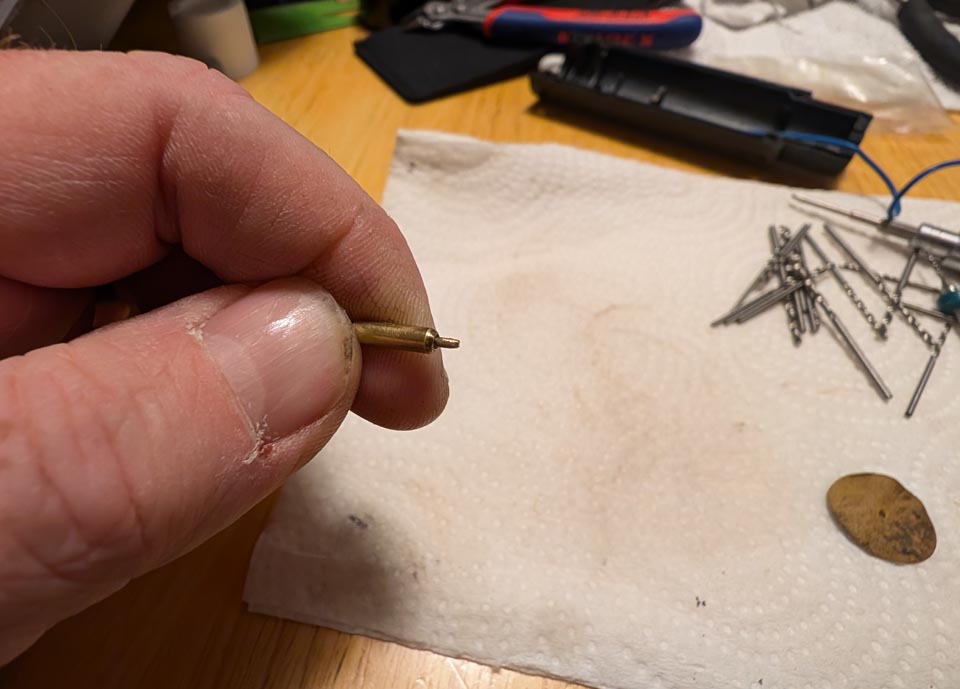
So...as I suspected, the two brass contacts in the torch head that are supposed to tell the FlexCut machine that all the consumables are in place have been shoved up inside the plastic covers, probably from a number of ham-fisted attempts by the previous owner at tightening the "retaining cap", which is really more of a threaded sleeve. I emailed Lincoln tech support...hopefully those are available as spares, or I may have to just bypass that circuit, but I would rather not. In case you wondered what the LC105M torch guts looked like...
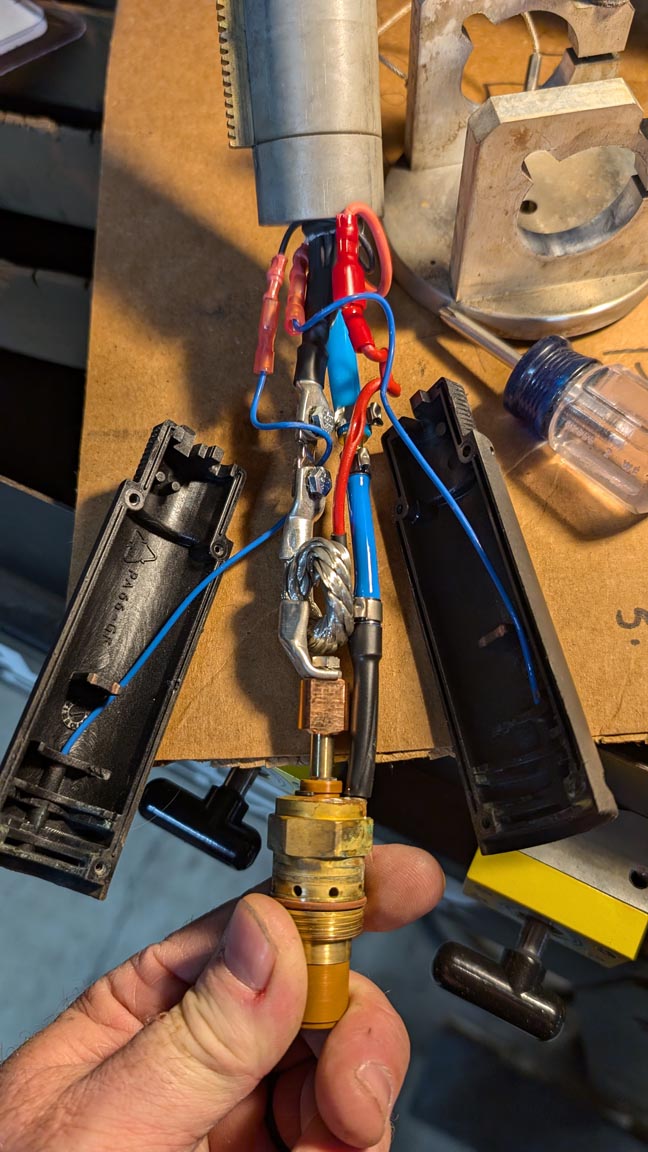
The split sleeve halves with the brass contacts...you can see they are not flush anymore, or not enough to make a consistent connection:
I see no way to get a thin punch in behind the contacts to push them back out, and if they got pushed in, they wouldn't stay pushed out for long anyway.
The split sleeve halves with the brass contacts...you can see they are not flush anymore, or not enough to make a consistent connection:
I see no way to get a thin punch in behind the contacts to push them back out, and if they got pushed in, they wouldn't stay pushed out for long anyway.
-
djreiswig

- 4.5 Star Elite Contributing Member

- Posts: 2020
- Joined: Thu Nov 19, 2015 10:02 pm
- Location: SE Nebraska
Re: Getting a Torchmate 4400 running
Is there a spring that's supposed to push the center part out? It looks like the outer brass part is mushroomed over and not allowing the center to pop out. Maybe clean the hole out with a small file or drill bit.
2014 Bulltear (StarLab) 4x8
C&CNC EtherCut
Mach3, SheetCam, Draftsight
Hypertherm PM65
Oxy/Acetylene Flame Torch
Pneumatic Plate Marker, Ohmic, 10 inch Rotary Chuck (in progress)
C&CNC EtherCut
Mach3, SheetCam, Draftsight
Hypertherm PM65
Oxy/Acetylene Flame Torch
Pneumatic Plate Marker, Ohmic, 10 inch Rotary Chuck (in progress)
-
weldguy
- 4.5 Star Elite Contributing Member
- Posts: 2168
- Joined: Fri Apr 17, 2009 11:48 am
Re: Getting a Torchmate 4400 running
I'm with djreiswig on this one. Those pins are spring loaded... can you push the center pin in further? and does it spring back out to the point its currently at? If the springs aren't collapsed you may be able to get them popping out again and save yourself some trouble.
-
jlasater
- 2 Star Member
- Posts: 89
- Joined: Thu Aug 08, 2024 5:41 pm
- Location: NE Oregon
- Contact:
Re: Getting a Torchmate 4400 running
I'll look into that. If they are too damaged, I'm thinking about pushing the pins out and replacing with small brass screws, adjusted to stick out just a touch, and connect the wires to them. Worst case, I just bypass that circuit. It's entirely possible to put the whole end back together and leave the nozzle or electrode out and still have the FlexCut machine think everything is there. It's really a poor way for it to detect consumables are installed.
And...LE said "Sorry, no parts available. We recommend buying a new torch". Oh..."Since you disassembled the torch, we won't be able to help you anymore until the unit is replaced"...that's not gonna happen at $1200 for the unit. This sort of thing just gets my hackles up.
And...LE said "Sorry, no parts available. We recommend buying a new torch". Oh..."Since you disassembled the torch, we won't be able to help you anymore until the unit is replaced"...that's not gonna happen at $1200 for the unit. This sort of thing just gets my hackles up.
-
jlasater
- 2 Star Member
- Posts: 89
- Joined: Thu Aug 08, 2024 5:41 pm
- Location: NE Oregon
- Contact:
Re: Getting a Torchmate 4400 running
Digikey has TONS of spring loaded electrical contacts, from miniscule to decent size. I may well be able to find what I need there.
-
jlasater
- 2 Star Member
- Posts: 89
- Joined: Thu Aug 08, 2024 5:41 pm
- Location: NE Oregon
- Contact:
Re: Getting a Torchmate 4400 running
Well I certainly wasn't expecting to see this when I went out to the shop to work on the LC105M torch some more.
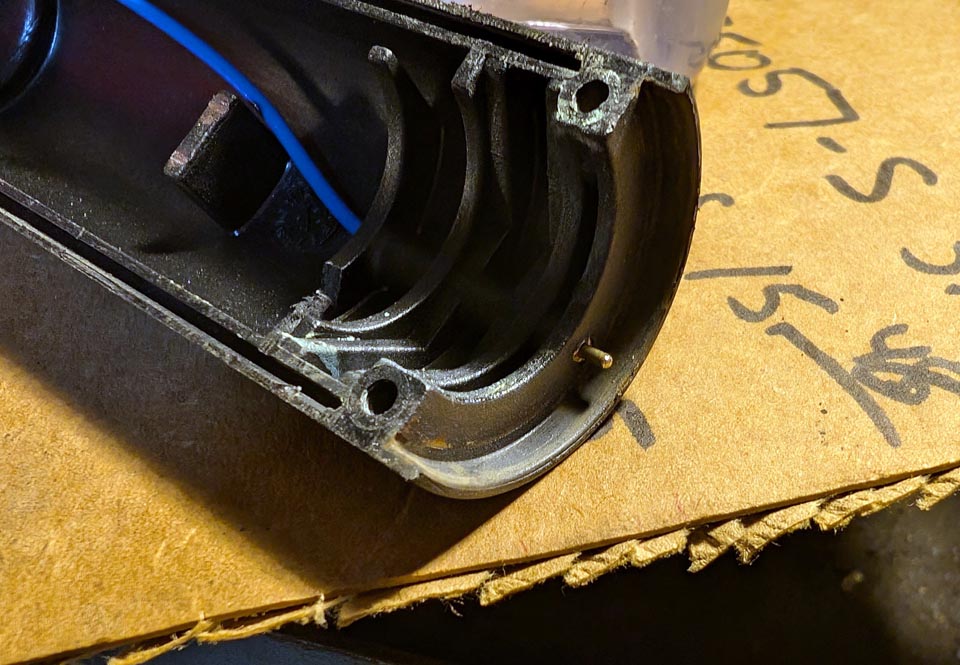
All the consumables had been out of the torch for a few days, and the torch disassembled. Both pins had popped out. Both were still very stiff so I disconnected them and proceeded to try to flush them with TV control cleaner which has just a touch of lubricant in it. I was able to get one of the pins to work very well, the other is being stubborn.

A lot of times patience pays off. Thanks for encouraging me to have a go at getting the pins working. I had written them off and was setting to replace them.
I plan on using just a touch of dielectric grease on the brass part of the "retaining cap", so when it screws on, it doesn't put undo sideload on the pins.
All the consumables had been out of the torch for a few days, and the torch disassembled. Both pins had popped out. Both were still very stiff so I disconnected them and proceeded to try to flush them with TV control cleaner which has just a touch of lubricant in it. I was able to get one of the pins to work very well, the other is being stubborn.
A lot of times patience pays off. Thanks for encouraging me to have a go at getting the pins working. I had written them off and was setting to replace them.
I plan on using just a touch of dielectric grease on the brass part of the "retaining cap", so when it screws on, it doesn't put undo sideload on the pins.
-
weldguy
- 4.5 Star Elite Contributing Member
- Posts: 2168
- Joined: Fri Apr 17, 2009 11:48 am
Re: Getting a Torchmate 4400 running
Thats great news. Thanks for posting your results.
-
djreiswig
- 4.5 Star Elite Contributing Member
- Posts: 2020
- Joined: Thu Nov 19, 2015 10:02 pm
- Location: SE Nebraska
Re: Getting a Torchmate 4400 running
That's wonderful. Nice when a problem solves itself.
2014 Bulltear (StarLab) 4x8
C&CNC EtherCut
Mach3, SheetCam, Draftsight
Hypertherm PM65
Oxy/Acetylene Flame Torch
Pneumatic Plate Marker, Ohmic, 10 inch Rotary Chuck (in progress)
C&CNC EtherCut
Mach3, SheetCam, Draftsight
Hypertherm PM65
Oxy/Acetylene Flame Torch
Pneumatic Plate Marker, Ohmic, 10 inch Rotary Chuck (in progress)
-
jlasater
- 2 Star Member
- Posts: 89
- Joined: Thu Aug 08, 2024 5:41 pm
- Location: NE Oregon
- Contact:
Re: Getting a Torchmate 4400 running
Well after having one of the two contacts getting stuck again and spending time pouring over Digikey for a replacement, I pulled gently on the little nubbin of the pin that was sticking out and the whole contact and wire pulled out. Much easier to work on. I ended up using a heatgun to apply a fair bit of heat but no so much as to melt the wire covering. In doing so, the pin would slowly poke out after a couple seconds at whatever temp it was at. Odd. So, tried to flush more of the control cleaner through it, tap the pin back in, and use the heatgun again. Rinse/repeat about 10 times and it's freed up and working great. What a fiddly design. I'll be sure to check the pins ever month and not leave the retaining cap tightened down if I'm not using the torch for a week or more.
-
MidnightMechanic
- 1/2 Star Member

- Posts: 4
- Joined: Sun Sep 15, 2024 12:56 pm
Re: Getting a Torchmate 4400 running
Hey jlasater, sounds like you've got a great setup with the Torchmate 4400! As for the issues you're facing:
1) Regarding VMD not loading any jobs, it's possible that the missing software licensing dongle could be the cause. You're correct in assuming it's usually for Torchmate's software, but it might be worth checking with Torchmate support just to be sure.
2) The trouble with the auto torch height control not functioning properly could be due to a calibration issue or a sensor misalignment. Double-check your settings and ensure that the THC is properly configured. If the problem persists, contacting support for further guidance might be beneficial.
3) Greasing the bearing cassettes can sometimes be tricky. Have you tried using a different type of grease or a different application technique? It's essential to ensure that the grease coupler fits snugly onto the nipple to prevent any leakage. If the issue persists, reaching out to Torchmate's technical support could provide you with some expert advice on the best way to grease those bearing cassettes effectively. Best of luck in getting your machine up and running smoothly!
-
jlasater
- 2 Star Member
- Posts: 89
- Joined: Thu Aug 08, 2024 5:41 pm
- Location: NE Oregon
- Contact:
Re: Getting a Torchmate 4400 running
Howdy, MidnightMechanic.
I've been able to move past all of those issues with research (and just paying better attention At this point in time, the machine is firing on all cylinders.
Thanks for the suggestions.
I've been able to move past all of those issues with research (and just paying better attention
Thanks for the suggestions.